


Rolled Bandages
Instructions for Constructing a Bandage Roller
Materials:
- Base-use 1” wood 6” x 4” x 1”
- End pieces- 5” x 2” ¼” x 1” with notches
- 4 nails one piece of 1/8” wire, 12” in length
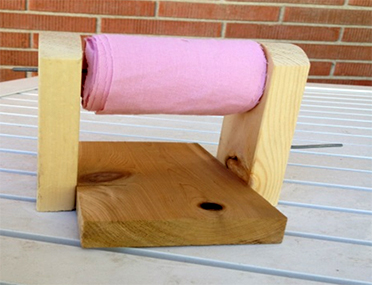
The wood blocks may be rounded for smoothness before nailing. Sand well before and after nailing. See picture.
Bore 3/16” hole one inch from the top of each end piece. Notch the end pieces to fit tightly against base (see illustration). For greatest strength drive nails into the end, one a little bit higher than the other.
Bend wire to form center bar and handle. In the center of the bar, flatten a three-inch strip so that the bandage will hold firmly. Insert aluminum wire through holes and turn handle. Bandage roller may be shellacked or varnished if desired.

Instructions for Making Rolled Bandages
- Materials: Old used sheets (colored sheets are acceptable) and needle and thread
- Size: The most useful size of bandage is 3 inches wide
- Method: Tear into 3 inch widths. It is useful to make them 6 yards long which may require stitching pieces together until you have 6 yards of continuous strip. This is not mandatory. Roll as tight as possible and then tack with cotton or thread to secure the end. These may be placed in the autoclave at the hospital for sterilizing when prepared this way. Rubber bands are not good as they get destroyed in the autoclave. Note: If you find in tearing up the sheets that you have a piece that is not 3 inches wide, do not discard this. Bandages may be made in 1”, 2”, 3” or 4” widths. Make any of these widths as a means of using up pieces unsuitable for the 3” bandage.
Shipping Address for Rolled Bandages:
Nazarene Hospital Foundation
460 Lone Oak Dr
Medford, OR 97504